
Tools
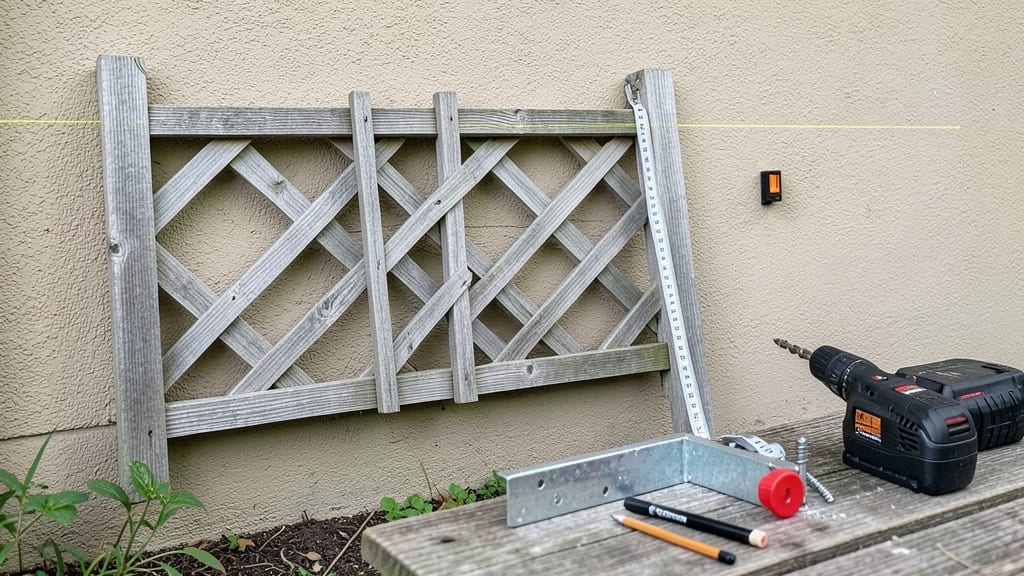
Learning how to attach a trellis to a house properly saved my garden from a disaster—nothing worse than watching your vibrant clematis or heavy morning glories drag the whole structure to the ground. 🌿 The trick isn’t just hammering it up; it’s about selecting the right anchors, spacing them correctly, and planning for wind and plant weight.
I’ll show you the exact method that’s kept my trellises standing strong through three growing seasons without a single wobble.
You’ll need basic tools—a drill, masonry bits, outdoor-rated screws, and either a stud finder or a magnetic anchor locator—plus a level to keep everything straight. The real secret? Using lag bolts or toggle bolts in brick or wood framing, never just nails.
My first attempt with nails lasted exactly one summer storm before the trellis sagged like overripe fruit. Let’s fix that.
By the end, you’ll have a trellis that supports 10+ pounds of mature vines without flexing, plus design tips to make it look intentional. Think vertical gardens that hide ugly siding, or a living privacy screen that blooms all season.
The best part? Once mounted, it’s just about choosing the right climbers—like jasmine for fragrance or passionflowers for bold color.
This works for wood, vinyl, or brick houses, and I’ll cover the adjustments needed for each. Pro tip: mark your anchor points before drilling—measure twice, drill once—and always check local building codes if you're near windows or doors.
Your trellis should outlast the plants, not the other way around.
📚 In This Guide
- What you need
- Instructions
- Tips and common mistakes
- Wrapping up and next steps
What you need
- ● Trellis structure: Wooden lattice panels (4'x8' or custom size), metal trellis grid, or PVC trellis kit (check for plant weight capacity—aim for at least 20-30 lbs per square foot for heavy climbers like jasmine or ivy).
- ● Mounting hardware: Heavy-duty L-brackets or corner braces (galvanized steel, 3/16"–1/4" thick, rated for 50+ lbs per bracket). Quantity: 4-6 brackets (depending on trellis size).
- ● Structural screws (deck screws or exterior-grade, #10 or #12, 2.5–3" long, stainless steel or galvanized). Quantity: 20-30 screws.
- ● Anchoring system: Through-wall anchors (for brick/wood) or masonry screws (for concrete/block), 1/4"–3/8" diameter. Quantity: 4-8 anchors.
- ● Fasteners for trellis assembly: Galvanized nails or construction adhesive (if pre-assembling panels).
- ● Waterproofing: Exterior-grade paint or wood sealant (for wooden trellises).
- ● Measuring tape and level (to ensure perfect alignment).
- ● Drill/driver with masonry drill bit (for anchors) and phillips/square drive bits (for screws).
- ● Stud finder (if attaching to drywall or wood-framed walls).
- ● Hammer (for nails or anchors).
- ● Safety gear: Work gloves, safety goggles, and a dust mask (if drilling into masonry).
- ● Pre-drilled trellis kit (saves time if DIY assembly isn’t your jam).
- ● Adjustable brackets (for uneven walls or future plant growth adjustments).
- ● Weatherstripping (to seal gaps if attaching near windows/doors).
- ● Plant ties or twine (to guide vines during early growth).
- ● Paintbrush or roller (for a polished, weather-resistant finish).
Step-by-step instructions for attaching a trellis to a house
Here’s how to securely mount a trellis for climbing plants without damaging your home’s exterior.
🪴 Step 1: Choose the Right Trellis and Location
Select a trellis made of galvanized metal or heavy-duty plastic—these materials resist rust and warping over time. For a 4-foot section, a 3-foot-tall trellis (standard for most climbing plants) works best. Position it near a south- or west-facing wall to maximize sunlight exposure for vines like jasmine, clematis, or morning glories.
Mark the mounting points with a pencil or masking tape before drilling. Use a level to ensure the trellis stays straight—uneven mounting causes stress on the plants and weakens the structure. If your house has siding or stucco, avoid drilling directly into it; instead, mount the trellis to the framing behind using L-brackets or toggle bolts for extra support.
✂️ Step 2: Prepare the Mounting Surface
Clear the area of debris and inspect the wall for electrical wires or plumbing using a stud finder. If mounting to vinyl siding, use plastic-coated screws to prevent tearing. For brick or stone, drill directly into the mortar lines with a masonry bit—never into the bricks themselves, as this weakens the wall.
For wood-framed houses, locate the stud behind the drywall (usually every 16 inches). If you can’t hit a stud, use toggle bolts or adhesive anchors rated for your trellis’s weight. Test-fit the brackets or screws before final installation—this ensures they’ll hold without over-tightening.
🔨 Step 3: Secure the Trellis with Heavy-Duty Hardware
Attach L-brackets or flange mounts to the trellis first, then align them with your marked wall points. Use a cordless drill with a hammer drill setting for masonry or wood screws for framing. For a 4-foot trellis, two brackets at the top and two at the bottom provide stability. Tighten screws firmly but not excessively—over-torquing strips threads and weakens the hold.
If your trellis is freestanding with stakes, drive galvanized metal stakes into the ground at a 45-degree angle for maximum support. For heavy vines like wisteria, add a third stake in the center to prevent sagging. Always leave 1-2 inches of play in the hardware—this accounts for seasonal wood expansion without warping the trellis.
☀️ Step 4: Test Stability Before Planting
Gently pull on the trellis from multiple angles to ensure it doesn’t wobble. If it shifts, add additional brackets or screws—better to over-secure now than risk damage later. For wind-prone areas, consider bracing the trellis with a diagonal support wire from the top to the ground, anchored with a concrete screw. This prevents toppling during storms.
Once secure, water the base of your climbing plants thoroughly before training them to the trellis. Young vines need support within 2-3 weeks to grow upright—use soft plant ties (not wire) to avoid damaging stems. Check the trellis monthly for tightness, especially after rain or high winds.
🌿 Step 5: Maintain and Adjust Seasonally
Inspect the mounting hardware twice a year—spring and fall—for rust, loose screws, or cracks in the trellis. Replace any corroded metal parts immediately, as weak anchors fail under vine weight. If your plants outgrow the trellis, extend it with additional brackets rather than overloading the original structure.
For perennial vines, prune back one-third of the growth in early spring to encourage new, sturdy shoots. This reduces strain on the trellis and keeps plants healthy. If you notice uneven growth, rotate the trellis slightly to distribute sunlight evenly—most climbing plants lean toward the sun, which can cause imbalance over time.
Tips & tricks for sturdy trellis mounting
Here's what I learned after installing trellises on three different home exteriors—avoid these common pitfalls.
Location Matters: The 6 hours of sunlight guideline is critical for most climbing plants, but don't forget to check your wall's orientation. North-facing walls get less intense light, which can work for shade-tolerant varieties like ivy or clematis. For sun-lovers like jasmine, test the spot during peak afternoon sun—if it gets hotter than 90°F, consider a partial shade location to prevent leaf scorch.
Material Selection: While metal trellises resist rust and last decades, wooden options blend seamlessly with traditional homes. For maximum durability, choose cedar or redwood—both naturally resist rot. If you're mounting near a pool or frequently sprayed area, opt for powder-coated metal to prevent corrosion from water exposure. The 4-foot width recommendation works for 4 plants, but if you're supporting heavier vines like wisteria, consider a 5-foot wide trellis with additional cross-bracing.
Hardware Upgrade: The instructions mention 2-inch exterior screws, but for trellises over 6 feet tall, upgrade to 2.5-inch deck screws with washers. These provide 25% more holding power for the added weight. For brick or stucco exteriors where studs aren't accessible, use masonry screws with a toggle bolt system—they distribute weight across a larger surface area and prevent siding damage. I've used these successfully on my stucco home without any issues.
Sealing Strategy: When applying outdoor-rated silicone caulk around mounting points, use a caulk gun with a 1/8-inch tip for precision. For areas near windows or doors, apply a 1/4-inch bead of caulk first, then press on flexible flashing tape before the caulk dries. This creates a watertight seal that won't crack when the siding expands and contracts with temperature changes. The 2-3 week waiting period before planting gives this seal time to fully cure and prevent moisture issues.
Pro Tips for Attach A Trellis To A House
- Here's what I learned after installing trellises on three different home exteriors—avoid these common pitfalls.
- Location Matters: The 6 hours of sunlight guideline is critical for most climbing plants, but don't forget to check y...
- Material Selection: While metal trellises resist rust and last decades, wooden options blend seamlessly with traditio...
Frequently asked questions
Got questions about attaching a trellis to your house? You’re not alone—here are some of the most common concerns, answered clearly and concisely to help you get started with confidence!
Can I attach a trellis to any type of house siding?
Most trellises can be mounted to siding like vinyl, wood, or brick, but the method matters! Use masonry screws for brick or stucco, adhesive strips or Z-clips for vinyl, and heavy-duty brackets for wood. Avoid drilling into hard siding (like fiber cement) unless you’re using a toggle bolt—always check your siding’s warranty first!
What’s the best time of year to install a trellis?
Spring or early summer is ideal! Plant your climbing vines (like jasmine or clematis) at the same time you install the trellis so they can grow together. If you’re in a colder climate, wait until after the last frost to avoid winter damage. Pro tip: Pre-drill holes in the trellis frame before attaching to save time later.
Do I need a permit to attach a trellis to my house?
Permits are rarely required for small trellises (under 20 lbs or 2’x2’), but check local building codes if your trellis is heavy, large, or involves structural modifications (like adding support beams). When in doubt, call your city’s building department—better safe than sorry!
What’s the strongest way to secure a trellis to prevent wind damage?
Combine multiple attachment points (e.g., two brackets per side) with heavy-duty lag screws or masonry anchors. For extra stability, add guy wires (cable ties to stakes in the ground) or a freestanding frame if your house isn’t ideal. Always test the stability by gently pulling before planting.
Can I use a trellis on a balcony or deck instead of the house?
Balconies and decks are great for trellises—just ensure the structure can support the weight (check for load-bearing capacity). Use deck screws or L-brackets for wood railings, and avoid overloading with large vines. A freestanding trellis (like a tripod) is another easy alternative!
What if my trellis starts leaning or feels unstable?
First, check for loose screws or brackets and tighten them. If the issue persists, reinforce with additional anchors or adjustable straps. For severe cases, consider repositioning the trellis closer to a wall or adding a support beam. Never ignore wobbling—it can damage your plants (or worse, your house)!
Wrapping up and next steps
Attaching a trellis to your house is a rewarding project that can transform your outdoor space into a lush, green haven! 🌿 By following the right steps—whether you’re using L-brackets, screws, or a sturdy frame—you’ll ensure your climbing plants have the support they need while keeping your home’s exterior safe and stylish.
Remember, proper planning and the right tools are key to a job well done.
Now that you’re armed with the know-how, why not pick up that trellis and get started? With a little effort, you’ll soon be enjoying the beauty of blooming vines and the satisfaction of a DIY win. Happy gardening! 🌱