
Orchid Care
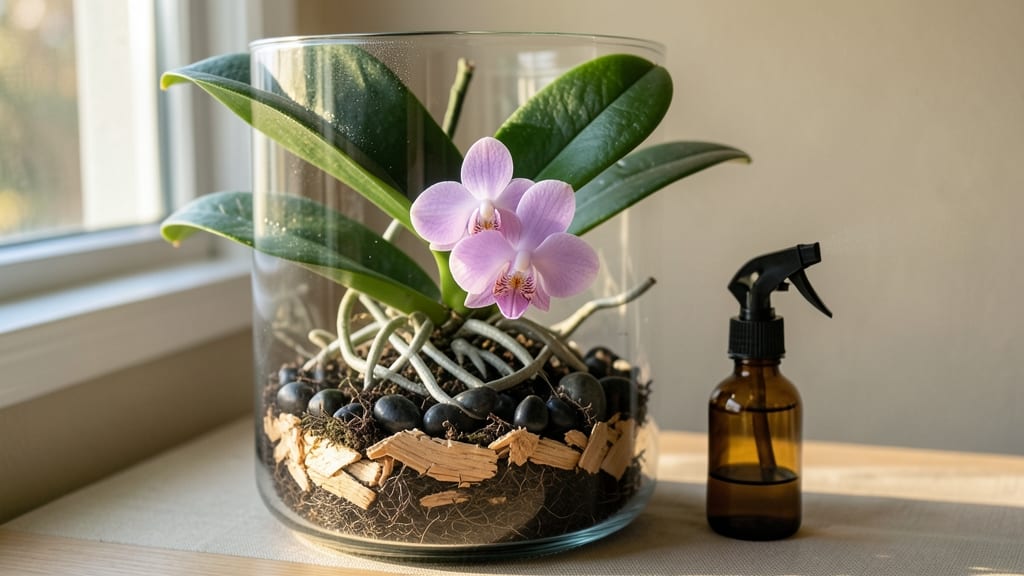
How to grow orchids in glass feels like creating a tiny, self-contained world where blooms last longer and roots thrive in perfect conditions. ✨ The trick isn't just finding the right orchid species—it's mastering the balance of light, humidity, and airflow inside that glass enclosure. My first attempt with a Phalaenopsis in a jar turned into a lush, blooming success after I adjusted the watering schedule and added ventilation.
You'll need a clear glass container (like a jar or terrarium), sphagnum moss or a chunky mix of perlite and bark, and an orchid that loves humidity—think Phalaenopsis or Paphiopedilum.
The glass traps moisture, so you'll water less frequently than with traditional pots, but you must monitor for mold or stagnant air. A small fan or cracked lid can save your plants from turning into a science experiment gone wrong.
What you end up with is orchids that bloom for months, not weeks, and roots that stay vibrant and healthy. The glass lets you watch the magic happen—new growth emerging, roots clinging to the sides, and flowers that seem to defy time.
It's gardening with a front-row seat to nature's slow-motion spectacle.
Works for any space—sunny windowsills, offices, or even bathrooms with indirect light. The key is patience and observation. Here's how to set it up without the guesswork.
📚 In This Guide
- What you need
- Instructions
- Tips and common mistakes
- Wrapping up and next steps
What you need
- ● Glass container: Size: Medium to large (6"–12" diameter or height, depending on orchid type).
- ● Type: Clear glass (e.g., fishbowl, terrarium, or vase with drainage holes).
- ● Quantity: 1 per orchid (or cluster if using a large container).
- ● Orchid plant: Type: Epiphytic orchids (e.g., Phalaenopsis, Dendrobium, or Vanda—avoid terrestrial orchids like Paphiopedilum).
- ● Health: Pest-free, with 2–3 pseudobulbs or mature leaves.
- ● Quantity: 1 per container (or 2–3 for larger setups).
- ● Mounting medium: Sphagnum moss (for moisture retention) OR orchid bark chips (for airflow).
- ● Quantity: Enough to partially submerge roots (1–2 cups, depending on container size).
- ● Drainage layer: Pebbles, charcoal, or small rocks (1–2 inches at the bottom).
- ● Spray bottle (with distilled or rainwater).
- ○ Humidity tray or pebble tray (optional but helpful for maintaining moisture).
- ○ Decorative elements (optional): Moss, driftwood, or decorative stones (for aesthetics).
- ● 🌡️ Temperature control: Place your glass container in indirect light (e.g., near a north or east-facing window). Avoid direct sun to prevent overheating.
- ● ✨ Ventilation: If using a sealed glass container, leave a small gap or crack the lid to prevent rot. For open containers, ensure airflow with a fan or natural breeze.
- ● 💧 Watering: Mist roots 2–3 times weekly and avoid soggy moss—glass traps humidity, so less water is often needed!
Step-by-Step instructions for growing orchids in glass containers
Glass containers create a mesmerizing display while giving orchids the humidity they crave—here's how to set it up right.
🪴 Step 1: Select the Right Glass Container and Mounting Medium
Choose a clear glass container with a wide mouth (at least 6 inches in diameter) to allow light penetration while maintaining humidity. I prefer low, wide bowls over tall vases because they provide more surface area for air circulation and root exposure. The container should have no more than 4 inches of depth—deeper glass traps too much moisture and risks root rot.
For mounting, use orchid bark (1-2 inch chunks) or sphagnum moss—both allow airflow while retaining moisture. Arrange the medium so it forms a stable base that won’t collapse when watered. If using bark, layer it in 2-inch sections to create pockets for roots to anchor. Press lightly to compact, but don’t overpack—roots need space to breathe.
🌱 Step 2: Plant the Orchid with Proper Spacing and Positioning
Remove the orchid from its nursery pot and gently separate the roots, teasing them apart if they’re matted. Place the rhizome (thickened stem base) at the center of the glass container, ensuring it sits just above the medium’s surface. This prevents suffocation from excess moisture while allowing roots to grow downward.
Space the roots evenly around the container, letting them drape naturally over the edges. If using bark, weave the roots between chunks—this mimics their natural epiphytic habitat. Avoid burying the rhizome; orchids rot when submerged. Once positioned, secure the plant by tying the pseudobulbs lightly to the container’s rim with orchid clip ties (not wire—it cuts).
💧 Step 3: Water and Maintain Humidity Without Overdoing It
Fill the glass container with room-temperature distilled water until it reaches just below the rim—about ½ inch from the top. Orchids absorb moisture through their roots and leaves, but stagnant water in the base causes rot. After 15 minutes, pour out any excess water that hasn’t been absorbed. This method mimics their natural rainfall cycles while preventing soggy conditions.
Place the container in bright, indirect light (east or west-facing windows are ideal). Direct sunlight scorches leaves, while too little light stunts blooms. You’ll know the humidity is right when tiny water droplets form on the glass sides—this indicates the ideal 60-80% humidity orchids thrive in. Mist the glass daily to maintain this microclimate, but avoid wetting the leaves directly.
☀️ Step 4: Monitor Light, Airflow, and Growth Signals
Orchids in glass need 12-14 hours of light daily, but the intensity matters more than duration. If leaves turn dark green with purple undersides, increase light gradually. If they yellow or develop brown patches, reduce exposure immediately. Rotate the container quarter-turn weekly so growth stays even—you’ll notice new roots reaching toward the glass edges within 4-6 weeks.
Check for root growth through the glass—healthy roots are silver-green when dry and bright green when moist. If roots stay gray or mushy, reduce watering. Conversely, if they shrivel, increase humidity by adding a small pebble tray with water beneath the container (just ensure the glass doesn’t sit directly in standing water).
✂️ Step 5: Prune and Refresh the Display Seasonally
After blooms fade, cut the spent flower spike at the second node down (where a new bloom might emerge). This redirects energy to root and leaf growth. If the medium breaks down after 12-18 months, remove the orchid, trim any dead roots with sterilized scissors, and repot in fresh bark or moss. Glass containers trap debris, so rinse the inside with distilled water monthly to prevent mold.
Every 3 months, check the rhizome’s health—it should feel firm, not soft or hollow. If you see black, mushy spots, trim those areas immediately and adjust watering. With this setup, your orchid will rebloom annually, and the glass display will showcase its air roots and delicate blooms like a living terrarium.
Tips & tricks for perfect orchid care in glass containers
Here's what nobody tells you about keeping orchids thriving in their glass habitats—details that make all the difference.
Container Depth Matters: That 4-inch depth limit in Step 1 isn't arbitrary—it creates the perfect balance between humidity retention and airflow. I've seen orchids in deeper containers develop root rot within weeks because excess moisture traps heat. For wider containers, consider using a shallow glass dish with a removable inner tray to catch runoff while keeping the orchid elevated. This two-tier system mimics their natural perching habits beautifully.
Root Positioning Secret: When placing your orchid in Step 2, think of the rhizome like a ship's keel—it needs to sit just above the medium to prevent waterlogging. I learned this the hard way after losing three orchids to rot when I buried them too deeply. For extra stability, tuck a few larger bark chunks beneath the rhizome to create a slight elevation, then weave the roots through the remaining medium. This creates natural air pockets that prevent suffocation.
Watering Technique: The 15-minute watering method in Step 3 is brilliant, but here's the trick: use a spray bottle to mist the roots and medium before adding water. This pre-hydration helps the bark or moss absorb moisture more evenly, preventing dry pockets. After pouring out excess, tilt the container slightly to let water drain from the base—orchids hate sitting in standing water, even for minutes.
Light Monitoring: Those 12-14 hours of light in Step 4 should be bright but diffused. I recommend placing your container near a sheer curtain during peak afternoon sun—this prevents leaf scorch while maintaining intensity. You'll know you've got the right balance when new growth appears between the leaves rather than just at the tips. If your orchid develops yellow patches, it's often a sign of too much direct light, not underwatering.
Pro Tips for Grow Orchids In Glass
- Here's what nobody tells you about keeping orchids thriving in their glass habitats—details that make all the differe...
- Container Depth Matters: That 4-inch depth limit in Step 1 isn't arbitrary—it creates the perfect balance between hum...
- Root Positioning Secret: When placing your orchid in Step 2, think of the rhizome like a ship's keel—it needs to sit ...
Frequently asked questions
Got questions about growing orchids in glass? You’re not alone—this method has its quirks! Here are some of the most common concerns and straightforward answers to set you up for success.
Can I use any glass container, or are there specific types?
Not all glass works! Opt for clear, thick-walled glass containers (like jars, terrariums, or repurposed fish tanks) with small drainage holes or a removable lid. Avoid thin or colored glass—it traps too much heat and blocks light. A 1-2 gallon size is ideal for most orchids like Phalaenopsis or Paphiopedilums.
How often should I water orchids in glass containers?
Glass retains moisture longer, so water every 7–10 days (or when the top inch of mix feels dry). Avoid overwatering—condensation inside the glass can lead to root rot. Use a spray bottle or misting method to keep humidity high without soggy roots. Check for mold or slimy mix as red flags!
Will orchids grow faster in glass?
Not necessarily! Glass creates a humidity-controlled microclimate, which can speed up growth if conditions (light, airflow, and water) are perfect. However, orchids still need bright, indirect light (4–6 hours daily) and occasional airflow breaks. Think of glass as a tool, not a shortcut—patience and balance are key!
What if my orchid’s roots turn black or mushy?
Black, squishy roots = root rot, usually from overwatering or poor drainage. Act fast:
- Remove the orchid from the glass.
- Trim dead roots with sterilized scissors.
- Repot in fresh, chunky mix (like bark or sphagnum moss) and reduce watering.
- Let it dry out for a week before watering again.
Can I grow orchids in glass year-round, even in winter?
Yes, but adjust for seasons! In winter, orchids may need less frequent watering (every 10–14 days) since glass slows evaporation. If your home is dry, add a humidifier nearby or place a tray of water with pebbles under the container. Avoid cold drafts—orchids thrive in 60–80°F temperatures.
Pro Tip:
Glass orchid growing is rewarding but requires observation. Keep a journal of watering, light exposure, and growth spurts. If your orchid’s leaves yellow or blooms drop, it’s often a sign of stress from over/under-watering or light issues. Tweak your setup gradually!
Wrapping up and next steps
Growing orchids in glass isn’t just a trend—it’s a rewarding way to nurture stunning blooms while embracing a unique, low-maintenance approach. With the right clear container, proper lighting, and a touch of patience, you’ll create an ideal microclimate for your orchids to thrive.
Remember, the key is balance: oxygen flow, humidity, and minimal interference are your best friends.
Ready to take the next step? Start with one orchid in a glass vessel and observe how it responds—then expand your collection! 🌱 Whether you’re a beginner or a seasoned grower, this method offers a fresh, creative twist on orchid care. Happy growing!