
Container Gardens
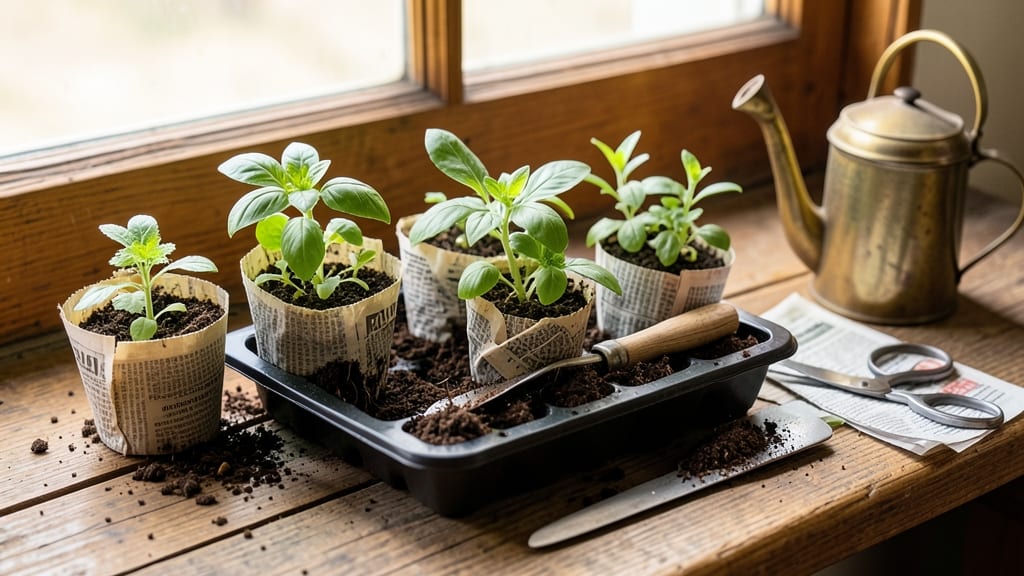
My first batch of newspaper pots saved me $20 on seedling trays—and the best part? They disappear into the soil when transplanting. 🌱 The secret lies in how newspaper's natural fibers encourage roots to grow outward instead of circling, giving you stronger seedlings ready for the ground.
You only need three things: newspaper (no glossy inserts!), water, and potting soil. Roll the paper into tubes, secure them with a rubber band, soak the bottoms, and fill with moist soil.
The whole process takes less than 10 minutes, and you can make dozens for pennies. No fancy tools or store-bought containers needed.
By transplanting directly into the ground, you eliminate the shock of root disturbance. The pots break down completely, leaving no waste behind. I’ve grown everything from tomatoes to marigolds this way, and the seedlings always seem to take off faster than those in plastic trays.
Fair warning: don’t make them too big—2-3 inches in diameter is perfect for most seeds. Overwatering is the biggest mistake, so keep the soil lightly moist but never soggy.
Add a pinch of compost to the mix for extra nutrients, and you’ve got a zero-waste system that even beginners can master.
📚 In This Guide
- What you need
- Instructions
- Tips and common mistakes
- Wrapping up and next steps
What you need
- ● Newspapers: 2-3 sheets per pot (black-and-white ink only—avoid color printing, which may contain harmful chemicals). Use free or recycled papers to keep it sustainable!
- ● Scissors: Sharp, clean scissors for clean cuts (no serrated edges—smooth is key!).
- ● Water: A spray bottle or small cup for dampening (not soaking—just lightly moist!).
- ● Seedling soil or potting mix: 1-2 cups per pot (sterilized, seed-starting blend preferred).
- ● Seeds: Your favorite flowers, herbs, or veggies (choose fast-growing varieties for best results!).
- ● Newspaper template: A small pot, cup, or even a rolled-up magazine to trace your pot shape (aim for 2-3 inches in diameter for seedlings).
- ● Ruler or measuring tape: For precise pot sizing (standard seedling pots are ~2-3 inches wide).
- ● Plastic wrap or clear bag: To create a mini greenhouse effect (great for humidity-loving seeds like lettuce or basil!).
- ● Twine or rubber bands: To secure the newspaper pot’s base (prevents unraveling during watering).
- ● Compost or worm castings: Mix into soil for extra nutrients (bonus points for sustainability! 🌱).
Step-by-step instructions for making newspaper pots
Here's the zero-waste method I swear by—no special tools, just household scraps and a little patience.
🌱 Step 1: Gather and Prepare Your Newspaper
Start with a sheet of black-and-white newspaper (color ink can leach chemicals into soil). I like to use the Sunday comics section—it's thick enough to hold shape but still flexible. Cut the sheet into 4 equal squares (each about 5x5 inches). Fold each square in half lengthwise, then unfold to create a crease down the middle—this will be your pot's spine.
Real talk: don't use glossy pages or inserts with plastic coatings. The ink and adhesives can harm seedlings, and you'll know it's wrong when the paper feels slick or coated. Stick to matte, uncoated newsprint only.
🪴 Step 2: Roll and Secure the Pot Shape
Take one folded square and roll it tightly into a cone shape, starting from the crease. Keep the roll snug but not crushed—you want it to hold its form once planted. When you reach the top, secure it by tucking the loose end into the roll itself (no tape or glue needed). I press the edge firmly against the side to create a sturdy seam. Repeat with all four squares.
Here's the thing—your first few pots might look lopsided. That's normal. The key is consistency in rolling pressure. If a pot collapses when you pick it up, you rolled it too loosely. Start over with that square.
💧 Step 3: Soak and Assemble the Pots
Fill a shallow tray with warm water and let the rolled pots soak for 5-10 minutes. This softens the fibers so they hold their shape when planted. While they soak, fill your seed-starting tray with moistened potting mix (about 1 inch deep). Press gently to remove air pockets but don't compact it.
After soaking, carefully lift each pot from the water and nestle it into the tray. Press the bottom edges lightly into the soil to anchor them. You'll see the newspaper fibers expand slightly—that's good. The pots will shrink slightly as they dry, but they'll stay intact enough to hold soil.
☀️ Step 4: Plant and Water Your Seeds
Plant 2-3 seeds per pot at the depth recommended on the packet (usually ¼ inch deep). I use my finger to make small holes—don't press too hard or you'll crush the fragile newspaper. Cover the seeds gently with additional potting mix, then water lightly from the bottom of the tray. You'll know it's right when the soil surface looks damp but not soggy.
Place the tray in a warm spot (70-75°F) with bright, indirect light (a south-facing window works). Avoid direct sun at first—it can dry the newspaper too quickly. You'll see germination in 5-14 days, depending on the seed type.
⏰ Step 5: Transplant Directly Without Disturbing Roots
When seedlings have 2-3 true leaves, they're ready to move. Here's the magic of newspaper pots: you can plant them directly into the garden without transplant shock. Simply slide the pot into its final hole, press soil around the edges to secure it, and water deeply. The newspaper will decompose within 4-6 weeks, enriching the soil as it breaks down.
Don't worry if the pots disintegrate faster in wet soil. The roots will have already established themselves by then. If you're planting in dry conditions, water the area well before transplanting to help the newspaper integrate smoothly.
Tips & tricks for perfect newspaper pots
These clever strategies will help you create sturdy, functional pots that actually work—no flimsy failures here.
Newspaper Selection Tip: For the best results, choose newspapers printed on matte, uncoated paper—avoid glossy sections or inserts with plastic coatings. The Sunday comics section is ideal because it's thick enough to hold shape while still being flexible. I've learned this the hard way after trying to use slick magazine pages that fell apart when wet. Test your paper by running your finger along it—if it feels smooth and slightly rough, you're good to go.
Rolling Technique: In Step 2, when rolling your newspaper squares, focus on even pressure along the entire length. Start from the crease and roll tightly but not so tight that the paper resists. The goal is to create a cone that holds its shape when planted. If you notice any gaps or uneven spots during rolling, gently press those areas with your thumb to seal them. This ensures your pots won't leak soil during watering.
Soaking Time Secret: The 5-10 minute soak in warm water is crucial for creating sturdy pots. Don't skip this step—it softens the fibers so they hold their shape when planted. I like to use a shallow tray filled with about 1/2 inch of warm water. After soaking, gently squeeze out excess water by pressing the bottom of each pot against the tray's edge. This prevents soggy soil that could cause rot.
Seedling Care: When your seedlings reach the 2-3 true leaves stage, handle them with care during transplanting. Gently press around the pot's edges to loosen it from the soil before sliding it into the garden. This minimizes root disturbance. In dry conditions, water the planting area well before transplanting to help the newspaper integrate smoothly into the soil.
Pro Tips for Make Newspaper Pots
- These clever strategies will help you create sturdy, functional pots that actually work—no flimsy failures here.
- Newspaper Selection Tip: For the best results, choose newspapers printed on matte, uncoated paper—avoid glossy sectio...
- Rolling Technique: In Step 2, when rolling your newspaper squares, focus on even pressure along the entire length. St...
Frequently asked questions
Got questions about making newspaper pots? You’re not alone!
Here are answers to the most common ones—so you can start growing with confidence and zero waste.
What kind of newspaper should I use?
Use uncoated, unglazed newspaper (like inserts or Sunday comics) without color ink. Avoid glossy or colored pages—they can harm seeds and soil. Recycle old papers from home or ask your local library or grocery store for donations!
How long do newspaper pots take to break down?
Newspaper pots decompose completely in 4–6 weeks when planted in soil. Until then, they’ll hold moisture well but may soften slightly. For faster breakdown, add a little compost or worm castings to the mix before planting.
Can I reuse newspaper pots for multiple plantings?
No—newspaper pots are single-use for seed-starting. Once planted, they’ll dissolve, but reusing them risks mold or uneven moisture. Instead, make a fresh batch for each new batch of seeds or repurpose old pots as compost!
What if my pots fall apart before planting?
If pots crumble too soon, try these fixes:
- Add 1–2 extra layers of newspaper for sturdiness.
- Use more water when rolling (soaked newspaper holds shape better).
- Store pots in a cool, dry place until ready to plant.
Are newspaper pots safe for all types of plants?
Yes! They’re great for most seeds, including herbs, veggies (tomatoes, peppers), and flowers. Avoid delicate seedlings like orchids or carnivorous plants—they need sterile, controlled environments. For these, opt for peat pots or biodegradable coir.
What’s an alternative if I don’t have newspaper?
No worries! Try these zero-waste swaps:
- Cardboard egg cartons (cut into individual cups).
- Toilet paper rolls (flatten and roll into pots).
- Biodegradable coir pots (store-bought but compostable).
- Molded paper pots (DIY with wet newspaper + a bowl mold).
Wrapping up and next steps
You’ve just unlocked a zero-waste, budget-friendly way to start your garden—no plastic pots needed! 🌱 With just a few sheets of newspaper and some creativity, you’re now ready to nurture seedlings into thriving plants. This method isn’t just eco-conscious; it’s simple, effective, and perfect for beginners.
Now that you’re armed with the know-how, take the next step: grab that stack of old newspapers and start your first pot today! Share your progress with fellow gardeners—your green thumb (and sustainable streak) will inspire others. Happy planting! 🌿✨