
Watering
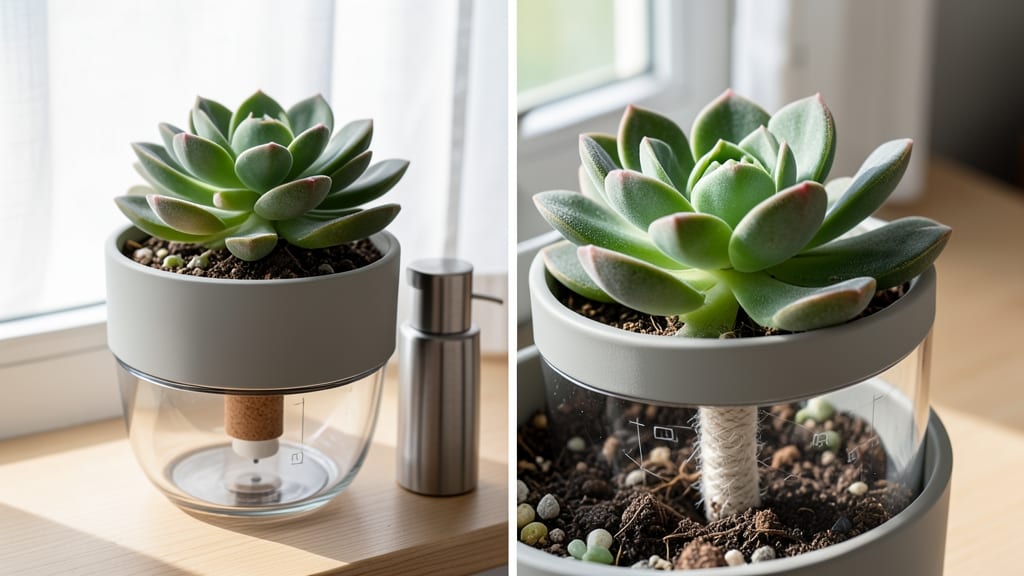
Self-watering plants mean less work and happier gardens. 🌱 I built my first system after forgetting to water my herbs—now they thrive while I travel. The secret lies in simple physics: a reservoir keeps roots consistently moist, so you water once a week instead of daily.
You’ll need a container with a waterproof liner, a wicking material (like landscape fabric), and plants that tolerate occasional dryness. Tomatoes, peppers, and herbs love this setup. The best part? No fancy tools—just a drill, some plastic sheeting, and basic gardening supplies from your local store.
Within 2-3 weeks, you’ll notice lusher foliage and fewer wilted leaves. The soil stays evenly damp, roots grow deeper, and you’ll spend 80% less time watering. Perfect for busy gardeners, vacationers, or anyone tired of wilting plants.
Works for raised beds, pots, or even window boxes. Let’s get your plants drinking on their own—here’s how to build it step by step.
📚 In This Guide
- What you need
- Instructions
- Tips and common mistakes
- Wrapping up and next steps
What you need
- ● Container: A large plastic bin, bucket, or trough (minimum 12" deep and 18" x 18" for small gardens; adjust size for bigger beds). Drill-duty plastic works best.
- ● Drill with hole saw bit (1/2"–3/4") and fine-tip bit (1/8") for precision.
- ● Wick material: Cotton rope (1/4"–1/2" thick, 10–20 ft depending on bed size) OR
- ● Absorbent landscape fabric (cut into strips, 1"–2" wide).
- ● Reservoir: A smaller inner container (e.g., 5-gallon bucket with holes drilled in the bottom) OR a waterproof bag (like a pond liner).
- ● Gravel or pebbles: 1–2" diameter, non-dissolving (e.g., aquarium rocks), 2–3 gallons for a small system.
- ● Potting soil: Lightweight, well-draining mix (e.g., cactus/succulent blend or 50% peat/50% perlite).
- ● Plants: Choose drought-tolerant varieties (e.g., herbs, veggies, or succulents) or moisture-loving plants (e.g., lettuce, basil).
- ● Waterproof sealant (e.g., silicone caulk) to prevent leaks.
- ● Water level indicator: A clear plastic tube inserted into the reservoir for easy monitoring.
- ● Pump system: A small submersible pump (for large beds) to automate water flow.
- ● Humidity dome: A clear plastic cover to retain moisture (great for seedlings!).
- ● Decorative cover: Landscape fabric or burlap to hide the reservoir for a clean look.
- ● Fertilizer tablets: Slow-release hydroponic nutrients for extra plant power.
Step-by-step instructions for creating a self-watering planter system
Here's the method I rely on to transform ordinary containers into self-sustaining hydration stations for any plant.
🪴 Step 1: Select and Prepare Your Container
Choose a container with a reservoir base or modify one by drilling a hole in the bottom for drainage. I prefer 5-gallon buckets with lids—the lid becomes the planting surface while the bucket holds water. Clean thoroughly with soapy water to remove any residue that could clog drainage.
For containers without built-in reservoirs, create a false bottom using hardware cloth or a plastic mesh. This holds soil above while allowing water to seep upward through capillary action. Place the mesh 1-2 inches above the container's base to ensure proper water storage below.
💧 Step 2: Build the Water Reservoir and Wick System
Cut a 2-inch diameter hole in the center of the container's lid (or planting surface) to create a water access point. Insert a 1-inch diameter PVC pipe or perforated plastic tube through this hole, securing it tightly with waterproof sealant. This tube will deliver water directly to the plant's root zone.
For the wick system, use cotton rope or landscape fabric strips cut into 12-18 inch lengths. Thread one end through the PVC pipe and bury the other end in the soil near the plant's roots. The rope will draw water upward as the plant consumes it. I like to use two wicks per plant for larger containers to ensure even moisture distribution.
☀️ Step 3: Layer Soil and Plant Strategically
Fill the container with well-draining potting mix mixed with 20% perlite or vermiculite to improve moisture retention. Leave a 1-inch gap between the soil surface and the container's rim to prevent spills when watering. Plant your chosen species—herbs, succulents, or small vegetables work exceptionally well in these systems.
Position the plant so its roots are 1-2 inches away from the wick's buried end. This proximity ensures immediate access to moisture while preventing root rot from constant saturation. Water the soil thoroughly before inserting the wicks to help them draw water upward efficiently.
⏰ Step 4: Test and Maintain the System
Fill the reservoir with water until it reaches just below the soil level in the planting area. Over time, you'll notice the wicks pull water upward, keeping the soil consistently moist. Check the reservoir every 3-5 days—top off when the water level drops below the wick's reach to maintain steady hydration.
Monitor your plant's response: healthy leaves and steady growth indicate the system is working. If you notice yellowing leaves or mushy stems, reduce the wick length slightly—the plant may be getting too much moisture. Adjust based on your climate; hotter weather will require more frequent reservoir checks.
🌱 Step 5: Scale and Customize for Your Garden
This basic design works for single plants, but you can expand it to multi-plant beds by creating a shared reservoir with multiple wicks. For example, a 4-foot long trough with a central water source can support 4-6 plants using a single wick system. Use clear tubing to monitor water levels visually.
Experiment with different wick materials—terry cloth strips or absorbent landscape fabric can work better for larger containers. The key is balancing moisture delivery with root health. Once perfected, these systems reduce watering by 70-80%, giving you more time to enjoy your garden instead of tending to it.
Tips & tricks for perfect self-watering planter systems
Transforming ordinary containers into self-sustaining hydration systems takes just a few strategic moves—and I've learned these the hard way after testing multiple setups.
Container Selection Matters: When choosing your 5-gallon bucket or alternative container, prioritize thickness and durability. Thin plastic containers can warp under moisture, while metal ones may rust. I've found food-grade plastic buckets with lids work best—they're sturdy, easy to clean, and won't degrade over time. For DIY containers, ensure any modifications like drainage holes are smooth-edged to prevent soil erosion during water movement.
Wick System Optimization: The 12-18 inch wick length specified works perfectly for most plants, but adjust based on your container's height. For deeper containers, extend wicks to reach the bottom reservoir while keeping the buried end within 2 inches of plant roots. I've had success with terry cloth strips in larger systems—they hold more water than cotton rope and last longer. Always pre-wet wicks before inserting to eliminate air pockets that could block water flow.
Soil Mix Precision: That 20% perlite or vermiculite isn't just about drainage—it's about creating the perfect moisture balance. Too much can dry out roots, while too little defeats the system's purpose. I recommend mixing your potting soil with perlite in a separate container first, then combining it with the vermiculite. This ensures even distribution. For container gardens, pre-moisten this mix before planting to help the wicks draw water immediately upon installation.
Climate Adaptation: The 3-5 day reservoir check schedule works for moderate climates, but hotter weather demands adjustments. In temperatures above 85°F, I reduce wick length by 2 inches and check reservoirs every 2-3 days. For cooler climates, you can extend checks to 5-7 days. Always position containers where they receive consistent light—partial shade is ideal to prevent excessive evaporation from both soil and reservoir.
Pro Tips for Make Self Watering Plant
- Transforming ordinary containers into self-sustaining hydration systems takes just a few strategic moves—and I've lea...
- Container Selection Matters: When choosing your 5-gallon bucket or alternative container, prioritize thickness and du...
- Wick System Optimization: The 12-18 inch wick length specified works perfectly for most plants, but adjust based on y...
Frequently asked questions
Got questions about DIY self-watering systems?
You’re not alone! Here are the most common concerns—and straightforward answers—to help you build a foolproof setup.
How often should I refill the water reservoir?
Most self-watering systems last 1-4 weeks between refills, depending on plant type, climate, and reservoir size. Monitor soil moisture—if the top inch feels dry, check the reservoir. Pro tip: Place a clear tube in the reservoir to visually track water levels!
Will this work for all plants?
Great for herbs, vegetables, and container plants (like tomatoes or peppers), but avoid heavy thirsts like bamboo or water lilies. Root-bound plants or those needing drainage-heavy soil may struggle. Test with a small batch first!
What if my plants still look wilted?
Check these fixes:
- Clogged wicks: Rinse or replace with clean, absorbent rope.
- Improper setup: Ensure the reservoir is lower than the plant bed for capillary action.
- Overwatering: Drain excess from the bottom tray weekly.
Can I use recycled materials instead of buying supplies?
Swap store-bought parts for:
- Reservoir: Clean plastic bins, buckets, or even a buried trash can.
- Wicks: Old towels, fabric strips, or even rolled newspaper.
- Container: Upcycled gutter systems, pallets, or wooden crates.
How do I adapt this for winter or cold climates?
Prevent freezing by:
- Insulating the reservoir with foam or bubble wrap.
- Using heat-resistant containers (like thick plastic).
- Moving potted systems to sheltered spots or indoors.
Wrapping up and next steps
Building your own self-watering plant system is a game-changer for busy gardeners! With just a few materials and a little creativity, you can ensure your plants stay hydrated—without the daily fuss.
Whether you’re tending to a small herb garden or sprawling flower beds, this DIY solution saves time and keeps your greens thriving.
Ready to take it further? Experiment with different designs—like adding a timer or decorative elements—to make your setup uniquely yours. 🌱✨ Happy gardening!