
Pruning
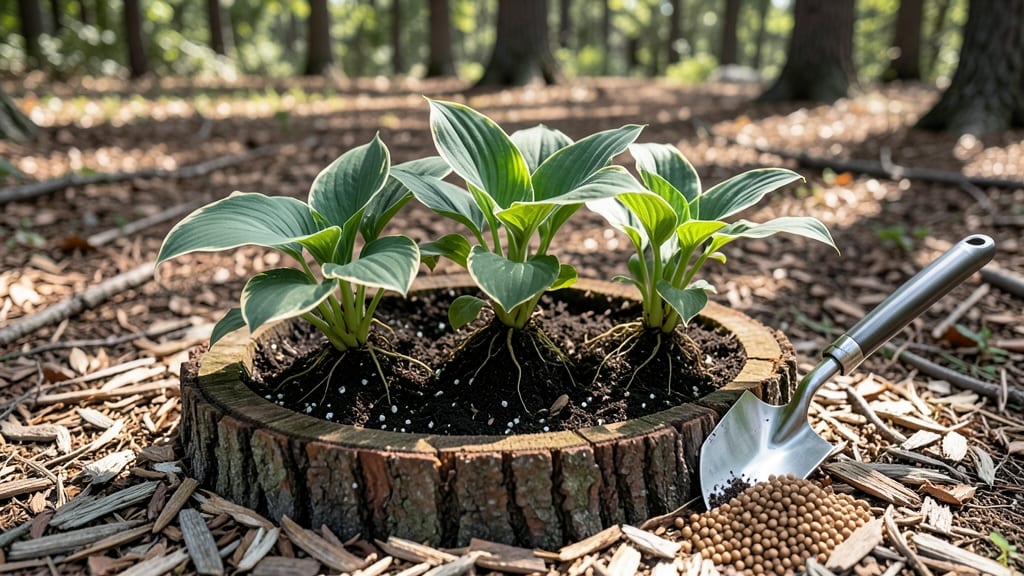
That hollowed-out tree stump becomes your garden's new centerpiece. 🌿 I've turned stumps into thriving planters that double as rustic seating—no more ugly stumps cluttering your yard. The secret lies in proper drainage and soil prep, which keeps roots happy while adding instant charm.
You'll need basic tools: a drill for drainage holes, a trowel for soil, and maybe a paintbrush if you want to add color. Shallow-rooted plants like ferns, succulents, or impatiens thrive in stump planters, while their vertical shape adds drama to any space.
The best part? This project costs almost nothing and transforms something ordinary into something extraordinary.
Imagine your stump overflowing with fragrant lavender or trailing ivy, creating a living sculpture that grows more beautiful each season. The drainage system ensures no soggy roots, while the natural wood texture adds organic warmth to your garden design.
It's the perfect way to repurpose nature's leftovers into something useful and stunning.
Works for any yard size, from city balconies to sprawling backyards. Whether you paint it, leave it natural, or add decorative stones, this planter becomes a conversation starter. Let's get that stump working for your garden instead of against it!
📚 In This Guide
- What you need
- Instructions
- Tips and common mistakes
- Wrapping up and next steps
What you need
Before you dive into crafting your upcycled tree stump planter, gather these materials and tools to ensure a smooth, creative process! Whether you're a DIY novice or a seasoned gardener, having everything ready will save you time and frustration. Here’s your
Step-by-Step instructions for creating a tree stump planter
Transform that old stump into a charming, functional planter with just a few tools and creative flair.
🪴 Step 1: Clean and Prepare the Stump
Start by removing any loose bark or debris from the stump's surface using a putty knife or wire brush. This ensures your paint or liner will adhere properly. I like to wear gloves for this part—those splinters are sneaky and persistent. Once clean, inspect the stump for cracks or holes. Seal any large gaps with outdoor-rated wood filler if you're using a liner, as these can tear during installation.
For stumps with deep crevices, a quick sanding with 80-grit sandpaper smooths rough edges. This step is especially important if you're painting the stump—smooth surfaces hold paint better and look more polished. Wipe away all dust with a damp cloth before moving to the next step. The goal here is a clean canvas ready for your design.
🎨 Step 2: Choose and Install Your Planter Liner
Select a liner based on your stump's size and your plants' needs. For small stumps, a fabric grow bag works beautifully—simply fold the top over and secure it with twine. For larger stumps, a heavy-duty plastic liner with drainage holes is ideal. Measure the stump's diameter and depth, then cut the liner to fit snugly, leaving about 4 inches of extra material at the top to fold over.
Place the liner inside the stump, pressing it into all crevices to create a seamless fit. For extra stability, especially with fabric liners, staple the excess material to the stump's outer edge using a heavy-duty staple gun. This prevents the liner from shifting when you add soil and plants. If you're using a plastic liner, drill a few small drainage holes in the bottom first—this prevents waterlogging, which can rot roots over time.
🌱 Step 3: Fill and Plant Your Upcycled Container
Fill the liner with a well-draining potting mix—avoid garden soil, as it compacts and suffocates roots. For a 4-inch deep stump, you'll need about 2-3 gallons of mix, while a 6-inch deep stump requires 4-5 gallons. Press the soil lightly to eliminate air pockets, but don't pack it down too firmly. This ensures roots can spread easily without struggling.
Choose plants that thrive in shallow root environments, like moss, ferns, or small succulents. For a dramatic look, arrange pregnant onion sets or shallow-rooted perennials in a circular pattern. Water thoroughly after planting to settle the soil and encourage root contact. Place the stump planter in a location that matches your plants' light requirements—most shallow-rooted plants prefer partial shade, but succulents need full sun.
💧 Step 4: Maintain and Enjoy Your Upcycled Planter
Water your stump planter deeply every 2-3 days during the first week, then adjust based on rainfall and plant type. Stumps dry out faster than traditional planters because they lack insulation, so check the soil 1 inch below the surface—if it's dry, it's time to water. For extra moisture retention, top the soil with 1 inch of mulch, like shredded bark or pine needles, to reduce evaporation.
Feed your plants with a balanced, slow-release fertilizer every 4-6 weeks during the growing season. Since stump planters have limited space, avoid over-fertilizing—this can burn delicate roots. Prune plants as needed to maintain their shape and encourage bushier growth. With proper care, your stump planter will thrive for years, becoming a unique focal point in your garden.
Tips & tricks for perfect tree stump planters
Turn your stump project from good to great with these insider tips that'll make your garden planter stand out—and last.
Stump Prep Pro Tip: If your stump has deep crevices in Step 1, consider using a wire brush with stiff bristles to really open up those nooks before sealing. This creates better adhesion for your liner or paint later. I've found that rough surfaces actually help the liner grip better, preventing shifting when you add soil. For extra protection, apply a thin layer of outdoor-rated wood sealer after sanding—this adds an extra barrier against moisture and extends your planter's lifespan.
Liner Installation Secret: When cutting your liner in Step 2, leave that extra 4 inches of material at the top, but don't just fold it over randomly. Instead, create a neat, uniform fold by making small pleats or gathering it into a decorative ruffle. This not only secures the liner better but also adds a polished, finished look to your planter. For plastic liners, use a sharp utility knife to cut clean edges—ragged edges can snag when you're planting.
Plant Selection Strategy: In Step 3, think vertically when choosing plants. Since stump planters have limited depth, select varieties with shallow root systems but interesting textures or heights. For example, pair low-growing moss at the edges with taller ferns in the center to create visual interest. Succulents like sedum or echeveria add architectural elements while thriving in the shallow soil. And here's a bonus: interplanting with wildflowers attracts pollinators and adds seasonal color changes.
Maintenance Hack: For Step 4's watering routine, I've found that using a moisture meter (the kind that looks like a pencil) is worth the investment. Stick it 1 inch below the soil surface—when it reads dry, that's your watering cue. Since stumps lack insulation, they dry out faster than regular planters, but this tool prevents both overwatering (which causes root rot) and underwatering (which stresses plants). During summer heatwaves, I water mine every morning instead of every 2-3 days to maintain consistent moisture.
Pro Tips for Make Tree Stump Planter
- Turn your stump project from good to great with these insider tips that'll make your garden planter stand out—and last.
- Stump Prep Pro Tip: If your stump has deep crevices in Step 1, consider using a wire brush with stiff bristles to rea...
- Liner Installation Secret: When cutting your liner in Step 2, leave that extra 4 inches of material at the top, but d...
Frequently asked questions
Got questions about turning that old tree stump into a thriving planter? You’re not alone! Here are some of the most common queries—and their answers—to help you create your upcycled garden oasis with confidence.
Can I use any tree stump, or are there restrictions?
Most hardwood stumps (like oak, maple, or birch) work great, but avoid softwoods (pine, cedar) or stumps treated with chemicals—they can harm plants. If the stump has signs of rot or pests, clean it thoroughly with a bleach solution (1 part bleach to 10 parts water) before planting. Pro tip: A slightly damp stump retains moisture better!
How long does it take for plants to grow in a stump planter?
Growth speed depends on the plant type! Succulents and herbs (like thyme or rosemary) may thrive in 2–4 weeks, while deeper-rooted plants (e.g., ferns or hostas) could take 1–2 months to show significant growth. Keep the soil consistently moist during the first few weeks to encourage root establishment.
What’s the best soil mix for a tree stump planter?
Use a well-draining potting mix blended with perlite or sand (50/50 ratio) to prevent waterlogging. For extra nutrients, add compost or slow-release fertilizer. If your stump has a deep cavity, layer the mix in stages to fill it completely. Pro tip: Avoid garden soil—it compacts and suffocates roots!
My stump planter is leaking—what can I fix it?
Leaks usually happen if the stump’s natural seal isn’t intact. Seal gaps with a waterproof liner (like pond liner) or apply a thick layer of hydroseal or silicone caulk around the edges. For a temporary fix, press sphagnum moss into cracks—it holds moisture while allowing drainage.
Do I need to move the planter in winter?
If you’re in a cold climate, protect your stump planter by wrapping the base with burlap or insulating it with mulch. For potted plants, move them indoors or cover with frost cloth. Evergreens or drought-resistant plants (like sedum) can often stay outside year-round with extra mulch.
What are some easy, low-maintenance plants for beginners?
Start with hardy, shallow-rooted plants like:
- Succulents (e.g., sedum, echeveria)—thrive on neglect!
- Herbs (thyme, oregano, mint)—drought-tolerant and fragrant.
- Ferns (e.g., maidenhair)—love moisture but not soggy soil.
- Ornamental grasses (like fountain grass)—add texture with minimal care.
Pro tip: Avoid heavy feeders like tomatoes or peppers—they’ll outgrow the space quickly!
Wrapping up and next steps
Transforming a tree stump into a vibrant planter is a rewarding way to breathe new life into your garden while reducing waste!
With just a few simple tools and materials, you’ve got the power to create a charming, functional piece that adds beauty and utility to your outdoor space. Now that you’re equipped with the know-how, why not grab your tools and get started? Your garden—and the planet—will thank you!
🌱 Pro tip: Share your stump planter project on social media—inspire others to upcycle too!